Community Node Disclaimer : This workflow uses KlickTipp community nodes.
How It Works
Automate transactional emails from KlickTipp via SMTP
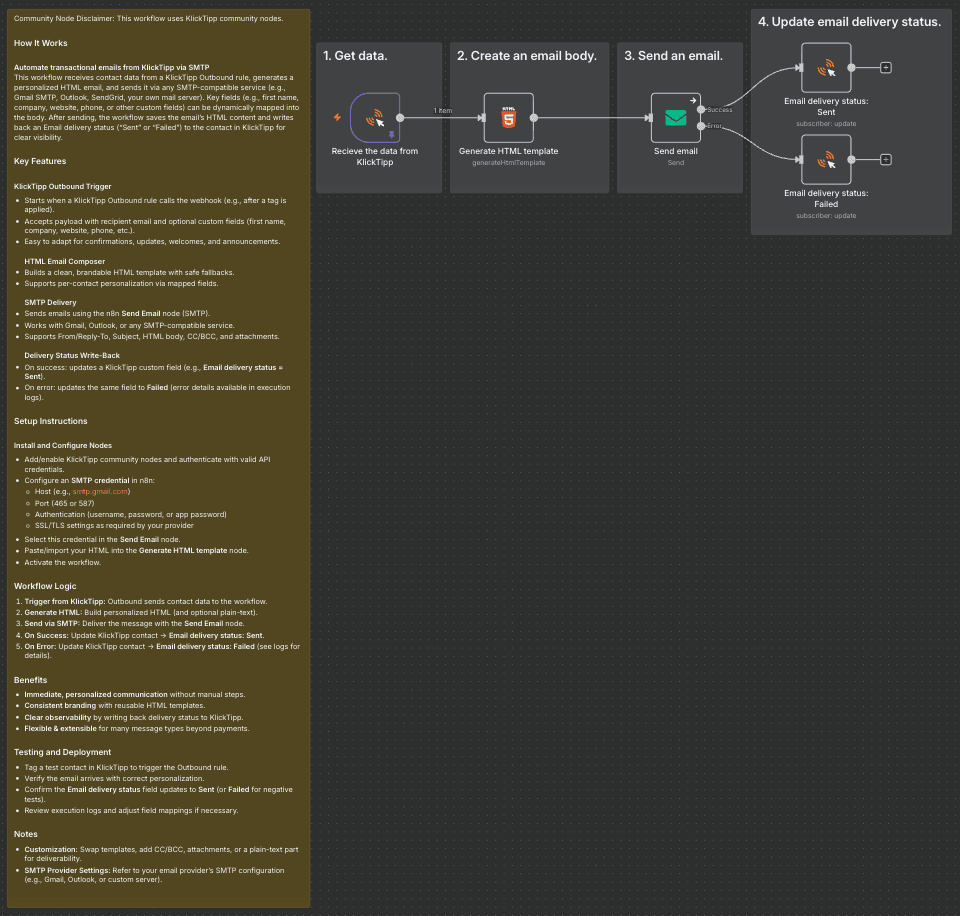
This workflow receives contact data from a KlickTipp Outbound rule, generates a personalized HTML email, and sends it via any SMTP-compatible service (e.g., Gmail SMTP, Outlook, SendGrid, your own mail server). Key fields (e.g., first name, company, website, phone, or other custom fields) can be dynamically mapped into the body. After sending, the workflow saves the email’s HTML content and writes back an Email delivery status (“Sent” or “Failed”) to the contact in KlickTipp for clear visibility.
Key Features
KlickTipp Outbound Trigger
- Starts when a KlickTipp Outbound rule calls the webhook (e.g., after a tag is applied).
- Accepts payload with recipient email and optional custom fields (first name, company, website, phone, etc.).
- Easy to adapt for confirmations, updates, welcomes, and announcements.
HTML Email Composer
- Builds a clean, brandable HTML template with safe fallbacks.
- Supports per-contact personalization via mapped fields.
SMTP Delivery
- Sends emails using the n8n Send Email node (SMTP).
- Works with Gmail, Outlook, or any SMTP-compatible service.
- Supports From/Reply-To, Subject, HTML body, CC/BCC, and attachments.
Delivery Status Write-Back
- On success: updates a KlickTipp custom field (e.g., Email delivery status = Sent).
- On error: updates the same field to Failed (error details available in execution logs).
Setup Instructions
Install and Configure Nodes
- Add/enable KlickTipp community nodes and authenticate with valid API credentials.
- Configure an SMTP credential in n8n:
- Host (e.g., smtp.gmail.com)
- Port (465 or 587)
- Authentication (username, password, or app password)
- SSL/TLS settings as required by your provider
- Select this credential in the Send Email node.
- Paste/import your HTML into the Generate HTML template node.
- Activate the workflow.
Workflow Logic
- Trigger from KlickTipp: Outbound sends contact data to the workflow.
- Generate HTML: Build personalized HTML (and optional plain-text).
- Send via SMTP: Deliver the message with the Send Email node.
- On Success: Update KlickTipp contact → Email delivery status: Sent.
- On Error: Update KlickTipp contact → Email delivery status: Failed (see logs for details).
Benefits
- Immediate, personalized communication without manual steps.
- Consistent branding with reusable HTML templates.
- Clear observability by writing back delivery status to KlickTipp.
- Flexible & extensible for many message types beyond payments.
Testing and Deployment
- Tag a test contact in KlickTipp to trigger the Outbound rule.
- Verify the email arrives with correct personalization.
- Confirm the Email delivery status field updates to Sent (or Failed for negative tests).
- Review execution logs and adjust field mappings if necessary.
Notes
- Customization: Swap templates, add CC/BCC, attachments, or a plain-text part for deliverability.
- SMTP Provider Settings: Refer to your email provider’s SMTP configuration (e.g., Gmail, Outlook, or custom server).